Here’s a complete blog post explaining how to build a modern calculator using Python Tkinter from scratch. This will cover everything from setting up Tkinter to customizing the UI for a sleek, modern look.
🎯 Title: Build a Modern Calculator Using Python Tkinter
🖋️ Introduction
In this tutorial, we’ll dive into creating a modern calculator app using Python’s Tkinter library. While Tkinter is known for creating basic GUI applications, we’ll take it a step further by designing a stylish, user-friendly calculator.
By the end of this guide, you’ll learn:
✅ How to set up a Tkinter window
✅ How to handle button events
✅ How to style your calculator with custom colors and fonts
✅ How to implement basic arithmetic operations
Whether you’re a beginner in Python GUI development or looking to sharpen your skills, this project will enhance your understanding of event handling and layout management in Tkinter.
⚙️ What is Tkinter?
Tkinter is the standard GUI library for Python. It provides a fast and easy way to create desktop applications with Python. Since it’s included with Python, you don’t need to install anything extra to use it.
Advantages of using Tkinter:
- Simple and lightweight
- Cross-platform (works on Windows, macOS, Linux)
- Comes bundled with Python
🚀 Setting Up Your Environment
Before we start, make sure you have Python installed. To check, run this command in your terminal:
python --version
Tkinter comes pre-installed with Python, but if you face any issues, you can install it using:
pip install tk
💻 Building the Calculator App
Let’s break down the entire code and explain how each part works.
🔍 1. Initializing the Tkinter Window
First, we need to set up the main application window.
import tkinter as tk

# Initialize the main window
root = tk.Tk()
root.title("Modern Calculator")
root.geometry("350x500")  # Set size of the window
root.configure(bg="#2d2d2d")  # Dark background
root.resizable(False, False)  # Disable resizing
Explanation:
tk.Tk(): Initializes the main application window.title(): Sets the window title.geometry(): Specifies the size of the window.configure(bg=...): Sets the background color.resizable(): Prevents the user from resizing the window.
🖊️ 2. Creating the Display Section
This section displays the numbers and results.
# Entry widget for display
entry = tk.Entry(root, font=('Segoe UI', 24), borderwidth=0, relief="flat", justify="right", bg="#1e1e1e", fg="white")
entry.grid(row=0, column=0, columnspan=4, padx=20, pady=20, ipady=20, sticky="nsew")
Key Points:
font: Sets the text font and size.borderwidth&relief: Removes the default border for a cleaner look.justify: Aligns the text to the right, like a typical calculator.bg&fg: Set the background and text colors.grid(): Places the entry widget in the GUI using the grid system.
🧮 3. Defining Calculator Functions
These functions will handle user inputs and perform calculations.
# Function to handle button clicks
def click(button_text):
    current = entry.get()
    entry.delete(0, tk.END)
    entry.insert(0, current + str(button_text))

# Function to clear the display
def clear():
    entry.delete(0, tk.END)

# Function to evaluate the expression
def calculate():
    try:
        result = eval(entry.get())
        entry.delete(0, tk.END)
        entry.insert(0, str(result))
    except:
        entry.delete(0, tk.END)
        entry.insert(0, "Error")
Explanation:
click(): Adds the clicked button’s value to the entry display.clear(): Clears the display entirely.calculate(): Evaluates the mathematical expression usingeval(). If there’s an error (like dividing by zero), it displays"Error".
🎨 4. Creating Modern Buttons
We’ll now create buttons for numbers, operations, and clear functionality.
# Function to create custom-styled buttons
def create_button(text, row, col, command, bg_color="#3e3e3e", fg_color="white"):
    button = tk.Button(
        root, text=text, command=command,
        font=('Segoe UI', 18), bg=bg_color, fg=fg_color,
        bd=0, activebackground="#5e5e5e", activeforeground="white",
        width=5, height=2
    )
    button.grid(row=row, column=col, padx=10, pady=10, sticky="nsew")
What’s Modern Here?
- Custom colors for background and text.
- Larger, easy-to-read fonts.
- Minimalistic design by removing borders (
bd=0). - Responsive padding and spacing.
🔢 5. Adding Buttons to the Grid
Now, we place buttons for digits and operators in a structured layout.
# Define button layout
buttons = [
    ('C', 1, 0, clear, "#ff5c5c"), ('/', 1, 1, lambda: click('/')), ('*', 1, 2, lambda: click('*')), ('-', 1, 3, lambda: click('-')),
    ('7', 2, 0, lambda: click('7')), ('8', 2, 1, lambda: click('8')), ('9', 2, 2, lambda: click('9')), ('+', 2, 3, lambda: click('+')),
    ('4', 3, 0, lambda: click('4')), ('5', 3, 1, lambda: click('5')), ('6', 3, 2, lambda: click('6')), ('=', 3, 3, calculate, "#4caf50"),
    ('1', 4, 0, lambda: click('1')), ('2', 4, 1, lambda: click('2')), ('3', 4, 2, lambda: click('3')), ('0', 4, 3, lambda: click('0')),
]

# Add buttons dynamically
for (text, row, col, command, *color) in buttons:
    bg_color = color[0] if color else "#3e3e3e"
    create_button(text, row, col, command, bg_color)
Special Customizations:
- The clear (C) button has a red color (
#ff5c5c). - The equals (=) button has a green color (
#4caf50). - All buttons have padding for a cleaner layout.
📱 6. Making the Calculator Responsive
We ensure the buttons and display adjust proportionally when resizing (even though resizing is disabled in this example).
# Configure grid weights for responsiveness
for i in range(5):
    root.grid_rowconfigure(i, weight=1)
    root.grid_columnconfigure(i, weight=1)
🔥 7. Running the Application
Finally, start the application loop.
# Run the application
root.mainloop()
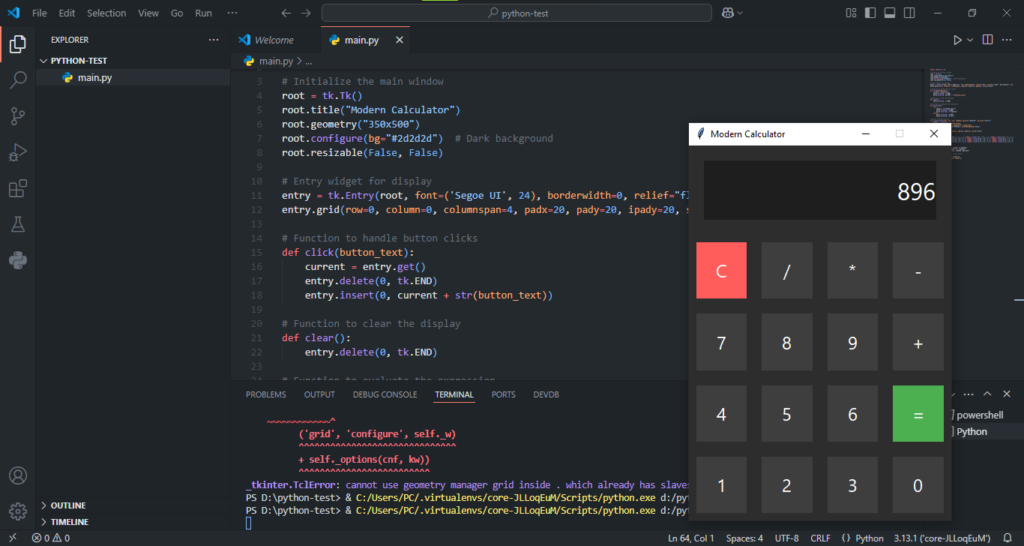
🏁 Final Output
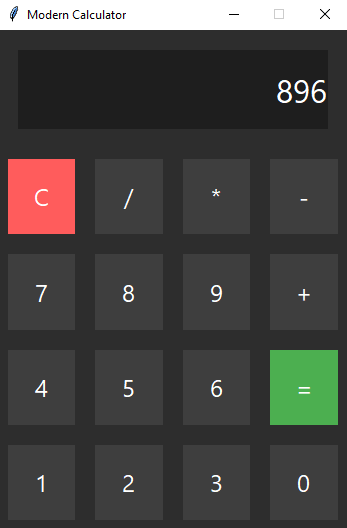
Once everything is set up, your calculator will have:
- A dark theme interface
- Responsive layout with proper button spacing
- Basic operations like addition, subtraction, multiplication, and division
- Error handling for invalid inputs
🔍 Further Improvements to Explore
Want to level up your calculator? You can try adding:
- Scientific functions (sin, cos, sqrt)
- Keyboard input support
- Light and dark mode toggle
- Animations for button clicks
💡 Conclusion
In this guide, we explored how to create a modern calculator using Python and Tkinter. This project not only helps you practice Python GUI development but also teaches you about event handling, custom styling, and layout management.
Now it’s your turn! Customize the calculator’s design and add more advanced features to make it your own. Happy coding! 🚀
Download Pdf