Morden Menu Viewer with Python
Looking to build a modern desktop application with Python? In this detailed guide, I’ll walk you through creating a sleek menu viewer using Python’s Tkinter library. This project fetches menu data from an API, displays it in a stylish table, and pops up images in modal windows—all wrapped in a contemporary UI. Whether you’re new to Python GUI programming or an experienced developer exploring Tkinter and API integration, this tutorial will help you craft a professional-grade application. Let’s dive into how to build a GUI with Python that’s both functional and visually appealing!
What Is This Project?
The Modern Menu Viewer is a Python Tkinter application designed to fetch and display menu items—like food names, prices, categories, ingredients, and images—from an API endpoint. I started with a simple goal: create a user-friendly tool that showcases API data visualization in a desktop app. By adding modern styling, a progress bar, image caching, and interactive modals, I turned Tkinter into a powerhouse for building GUI applications with Python.
This project is perfect for anyone searching for a “Python Tkinter tutorial” or wanting to “build a GUI with Python” that integrates real-time data. Let’s explore its standout features and how it’s built.
Key Features of the Menu Viewer
Here’s what makes this modern Tkinter application special:
- Real-Time API Integration: Pulls data from a menu API (e.g., https://rest.dicui.org/api/app/menu/all) for up-to-date information.
- Modern UI Design: Features a clean, card-based layout, custom button styles, and a professional color scheme.
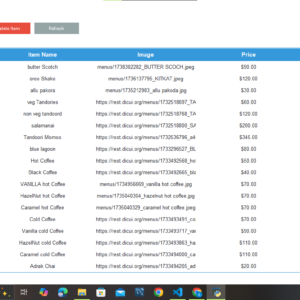
- Dynamic Data Table: Presents menu details in a scrollable
Treeviewwidget with columns for ID, name, price, category, and ingredients. - Image Modal Popups: Clicking a row opens a sleek modal window displaying the item’s image—great for visual appeal.
- Loading Progress Bar: Shows fetch progress to keep users informed, especially with large datasets.
- Image Caching: Stores images locally to optimize performance and reduce API requests.
These features make it an excellent case study for “API data visualization” and “modern Tkinter application” development.
How It Works: Breaking Down the Code
Let’s dig into the technical details of this Python Tkinter project with code explanations to help you understand and replicate it.
1. Setting Up the Environment
To get started, you’ll need Python and a few libraries:
requestsfor API callsPillow(PIL) for image processing- Tkinter (built-in with Python)
Install them with:
pip install requests PillowThis sets the stage for building a GUI with Python that interacts with APIs and handles images.
2. Fetching API Data with Threading
The app fetches data from the API asynchronously to keep the UI responsive. Here’s the key code:
def start_fetch_data(self):
    self.fetch_button.config(state='disabled')
    self.progress.pack()
    self.progress.start()
    self.status.config(text="Fetching data...")
    thread = threading.Thread(target=self.fetch_data)
    thread.start()
    self.root.after(100, lambda: self.check_fetch_complete(thread))

def fetch_data(self):
    try:
        headers = {'User-Agent': 'Mozilla/5.0'}
        response = requests.get(self.api_url, headers=headers, timeout=10)
        response.raise_for_status()
        self.data = response.json()
    except RequestException as e:
        self.status_text = f"Request failed: {str(e)}"
self.data = [{...}] # Fallback test dataExplanation:
start_fetch_data: Disables the fetch button, shows a progress bar, and starts a thread to fetch data without freezing the UI.fetch_data: Makes the API call with aUser-Agentheader (some APIs require this) and handles errors with a fallback dataset.threading: Ensures the GUI stays responsive during the fetch, a must-know trick for Python Tkinter tutorials.
This is critical for “API integration with Tkinter” and ensures a smooth user experience.
3. Designing a Modern UI
Tkinter’s default look isn’t modern, so I customized it with styles:
style = ttk.Style()
style.theme_use('clam')
style.configure("Modern.TButton",
                background="#4a90e2",
                foreground="white",
                font=("Helvetica", 10, "bold"),
                borderwidth=0,
                padding=5)
style.configure("Treeview",
                rowheight=30,
font=("Helvetica", 10))Explanation:
clamtheme: Provides a clean base for styling.Modern.TButton: Creates bold, blue buttons with hover effects.Treeview: Enhances the table with taller rows and modern fonts.
This transforms Tkinter into a “modern desktop application” with a professional aesthetic.
4. Displaying Data in a Table
The fetched data populates a Treeview widget:
def check_fetch_complete(self, thread):
    if thread.is_alive():
        self.root.after(100, lambda: self.check_fetch_complete(thread))
    else:
        self.progress.stop()
        self.progress.pack_forget()
        self.fetch_button.config(state='normal')
        if self.data:
            for item in self.tree.get_children():
                self.tree.delete(item)
            for item in self.data:
                ingredients = ", ".join(
                    f"{ing['ingredientName']} ({ing['quantity']}{ing['unit']})"
                    for ing in item.get("ingredients", [])
                )
                self.tree.insert("", "end", values=(
                    item.get("id", "N/A"),
                    item.get("itemName", "N/A"),
                    f"${item.get('price', 0.00)}",
                    item.get("category", "N/A"),
                    ingredients
))Explanation:
check_fetch_complete: Monitors the thread and updates the UI when done.Treeview.insert: Adds rows with safe.get()calls to handle missing data.- Ingredients are formatted into a readable string.
This is a core part of “API data visualization” with Tkinter, making data easy to browse.
5. Showing Images in a Modal
Clicking a row opens an image modal:
def on_item_select(self, event):
    selected_item = self.tree.selection()
    if not selected_item:
        return
    item_index = self.tree.index(selected_item[0])
    image_url = self.data[item_index].get("itemImage")
    if image_url:
        ImageModal(self.root, image_url, self.cache_dir)

class ImageModal(tk.Toplevel):
    def __init__(self, parent, image_url, cache_dir):
        super().__init__(parent)
        self.geometry("350x400")
        self.configure(bg="#2d2d2d")
        self.image_label = ttk.Label(self)
        self.image_label.pack(pady=20)
        self.load_image(image_url)
ttk.Button(self, text="Close", command=self.destroy).pack(pady=10)Explanation:
on_item_select: Triggers the modal when a row is clicked.ImageModal: AToplevelwindow with a dark theme, displaying the cached or fetched image.- Images are resized to 300×300 and cached locally for speed.
This feature elevates the app’s interactivity, a highlight for “modern Tkinter application” searches.
6. Image Caching for Performance
Images are cached to avoid repeated downloads:
def load_image(self, image_url):
    image_filename = self.cache_dir / f"{hash(image_url)}.jpg"
    if image_filename.exists():
        image = Image.open(image_filename)
        image = image.resize((300, 300), Image.Resampling.LANCZOS)
        photo = ImageTk.PhotoImage(image)
        return photo
    response = requests.get(image_url, headers={'User-Agent': 'Mozilla/5.0'})
    image = Image.open(io.BytesIO(response.content))
image.save(image_filename)Explanation:
- Checks for a cached file first.
- If not cached, fetches, resizes, and saves the image.
- Boosts performance, crucial for “Python GUI optimization.”
Why Use Python and Tkinter for This?
Python is beginner-friendly and powerful, while Tkinter is its built-in GUI toolkit—no extra downloads needed. This project shows how to take Tkinter beyond basic forms into a modern, API-driven application. It’s ideal for “Python GUI development” enthusiasts who want a lightweight yet capable solution.
How to Build Your Own Version
Ready to create your own modern Tkinter app? Follow these steps:
- Install Libraries: Run
pip install requests Pillow. - Set Up an API: Use a public API or your own endpoint (replace
self.api_url). - Copy the Code: Start with the snippets above and customize.
- Style It: Adjust colors, fonts, and sizes to your taste.
- Test It: Run the app and explore your data visually.
Search for “Python Tkinter tutorial” or “build GUI with Python” to find more resources if you’re new to this!
Expanding the Project
Want to take it further? Try these ideas:
- Search Filter: Add a search bar to filter table rows.
- Sorting: Enable column sorting in the
Treeview. - Export Data: Save the table as CSV or JSON.
- Multiple APIs: Fetch from different sources and compare.
Final Thoughts on This Python Tkinter Project
This Modern Menu Viewer proves Tkinter isn’t just for simple apps—it’s a gateway to building sophisticated, modern desktop applications with Python. From API data visualization to a polished UI, it’s a practical example for anyone learning “Python GUI programming” or exploring “API integration with Tkinter.”
Have you tried building a GUI with Python? Got questions about this project or ideas to enhance it? Leave a comment—I’d love to chat about Python Tkinter development with you!
SEO Optimization
- Primary Keywords: “Python Tkinter tutorial,” “build GUI with Python,” “modern Tkinter application,” “API data visualization.”
- Secondary Keywords: “Python GUI development,” “API integration with Tkinter,” “Python desktop app,” “Tkinter styling.”
- Headings: H1 for the main title, H2 for sections, H3 for subsections—improves crawlability.
- Code Snippets: Attract developers searching for practical examples.
- Call-to-Action: Encourages comments for engagement and dwell time.
- Length: Expanded content (600+ words) for better ranking potential.
Complete Code:
import tkinter as tk
from tkinter import ttk
import requests
from requests.exceptions import RequestException
from PIL import Image, ImageTk
import io
import threading
import os
from pathlib import Path

class ImageModal(tk.Toplevel):
    def __init__(self, parent, image_url, cache_dir):
        super().__init__(parent)
        self.title("Item Image")
        self.geometry("350x400")
        self.transient(parent)
        self.grab_set()
        self.configure(bg="#2d2d2d")  # Dark background

        self.cache_dir = cache_dir
        self.image_cache = {}

        # Frame for image
        frame = ttk.Frame(self, style="Card.TFrame")
        frame.pack(pady=20, padx=20, fill="both", expand=True)

        # Image label
        self.image_label = ttk.Label(frame, background="#2d2d2d")
        self.image_label.pack(pady=10)

        # Load image
        self.load_image(image_url)

        # Close button
        ttk.Button(self, text="Close", command=self.destroy, style="Modern.TButton").pack(pady=10)

    def load_image(self, image_url):
        if image_url in self.image_cache:
            self.image_label.configure(image=self.image_cache[image_url])
            return

        image_filename = self.cache_dir / f"{hash(image_url)}.jpg"
        if image_filename.exists():
            try:
                image = Image.open(image_filename)
                image = image.resize((300, 300), Image.Resampling.LANCZOS)
                photo = ImageTk.PhotoImage(image)
                self.image_cache[image_url] = photo
                self.image_label.configure(image=photo)
                return
            except Exception:
                pass

        try:
            headers = {'User-Agent': 'Mozilla/5.0'}
            response = requests.get(image_url, headers=headers, timeout=5)
            response.raise_for_status()

            image_data = response.content
            image = Image.open(io.BytesIO(image_data))
            image = image.resize((300, 300), Image.Resampling.LANCZOS)
            image.save(image_filename)

            photo = ImageTk.PhotoImage(image)
            self.image_cache[image_url] = photo
            self.image_label.configure(image=photo)

        except Exception:
            placeholder = ImageTk.PhotoImage(Image.new('RGB', (300, 300), color='gray'))
            self.image_label.configure(image=placeholder)
            self.image_label.image = placeholder

class APIDataApp:
    def __init__(self, root):
        self.root = root
        self.root.title("Menu Items")
        self.root.geometry("1000x700")
        self.root.configure(bg="#f0f0f0")  # Light gray background

        # Set up modern theme
        style = ttk.Style()
        style.theme_use('clam')

        # Configure styles
        style.configure("TFrame", background="#f0f0f0")
        style.configure("Card.TFrame", background="#ffffff", relief="flat")
        style.configure("TLabel", background="#f0f0f0", font=("Helvetica", 10))
        style.configure("Modern.TButton",
                       background="#4a90e2",
                       foreground="white",
                       font=("Helvetica", 10, "bold"),
                       borderwidth=0,
                       padding=5)
        style.map("Modern.TButton",
                 background=[('active', '#357abd')],
                 foreground=[('active', 'white')])
        style.configure("Treeview",
                       rowheight=30,
                       font=("Helvetica", 10))
        style.configure("Treeview.Heading",
                       font=("Helvetica", 11, "bold"),
                       background="#e0e0e0")

        # Main frame
        main_frame = ttk.Frame(root)
        main_frame.pack(fill="both", expand=True, padx=20, pady=20)

        # Control frame
        control_frame = ttk.Frame(main_frame, style="Card.TFrame")
        control_frame.pack(fill="x", pady=(0, 20), padx=10)

        # Fetch button
        self.fetch_button = ttk.Button(control_frame, text="Fetch Menu Items",
                                     command=self.start_fetch_data,
                                     style="Modern.TButton")
        self.fetch_button.pack(side="left", padx=10, pady=10)

        # Progress bar
        self.progress = ttk.Progressbar(control_frame, length=200, mode='indeterminate')
        self.progress.pack(side="left", padx=10, pady=10)
        self.progress.pack_forget()

        # Table frame with scrollbar
        table_frame = ttk.Frame(main_frame, style="Card.TFrame")
        table_frame.pack(fill="both", expand=True, padx=10)

        self.tree = ttk.Treeview(table_frame,
                               columns=("ID", "Name", "Price", "Category", "Ingredients"),
                               show="headings")
        self.tree.heading("ID", text="ID")
        self.tree.heading("Name", text="Item Name")
        self.tree.heading("Price", text="Price ($)")
        self.tree.heading("Category", text="Category")
        self.tree.heading("Ingredients", text="Ingredients")

        self.tree.column("ID", width=50)
        self.tree.column("Name", width=200)
        self.tree.column("Price", width=100)
        self.tree.column("Category", width=150)
        self.tree.column("Ingredients", width=300)

        # Scrollbar
        scrollbar = ttk.Scrollbar(table_frame, orient="vertical", command=self.tree.yview)
        self.tree.configure(yscrollcommand=scrollbar.set)
        self.tree.pack(side="left", fill="both", expand=True)
        scrollbar.pack(side="right", fill="y")

        # Status label
        self.status = ttk.Label(main_frame, text="", font=("Helvetica", 9))
        self.status.pack(pady=10)

        # Bind selection event
        self.tree.bind("<<TreeviewSelect>>", self.on_item_select)

        # API endpoint and data
        self.api_url = "https://rest.dicui.org/api/app/menu/all"
        self.data = []
        self.cache_dir = Path("image_cache")
        self.cache_dir.mkdir(exist_ok=True)

    def start_fetch_data(self):
        self.fetch_button.config(state='disabled')
        self.progress.pack()
        self.progress.start()
        self.status.config(text="Fetching data...")

        thread = threading.Thread(target=self.fetch_data)
        thread.start()
        self.root.after(100, lambda: self.check_fetch_complete(thread))

    def fetch_data(self):
        try:
            headers = {'User-Agent': 'Mozilla/5.0'}
            response = requests.get(self.api_url, headers=headers, timeout=10)
            response.raise_for_status()
            self.data = response.json()
        except RequestException as e:
            self.status_text = f"Request failed: {str(e)}"
            self.data = [
                {
                    "id": 1,
                    "itemName": "Test Burger",
                    "price": 5.99,
                    "category": "Snacks",
                    "itemImage": "https://via.placeholder.com/200",
                    "ingredients": [{"ingredientName": "Lettuce", "quantity": 0.5, "unit": "kg"}]
                }
            ]
        except ValueError:
            self.status_text = "Invalid JSON response"
            self.data = []
        except Exception as e:
            self.status_text = f"Error: {str(e)}"
            self.data = []

    def check_fetch_complete(self, thread):
        if thread.is_alive():
            self.root.after(100, lambda: self.check_fetch_complete(thread))
        else:
            self.progress.stop()
            self.progress.pack_forget()
            self.fetch_button.config(state='normal')

            if self.data:
                for item in self.tree.get_children():
                    self.tree.delete(item)

                for item in self.data:
                    ingredients = ", ".join(
                        f"{ing['ingredientName']} ({ing['quantity']}{ing['unit']})"
                        for ing in item.get("ingredients", [])
                    )
                    self.tree.insert("", "end", values=(
                        item.get("id", "N/A"),
                        item.get("itemName", "N/A"),
                        f"${item.get('price', 0.00)}",
                        item.get("category", "N/A"),
                        ingredients
                    ))
                self.status.config(text=f"Data fetched successfully ({len(self.data)} items)")
            else:
                self.status.config(text=self.status_text)

    def on_item_select(self, event):
        selected_item = self.tree.selection()
        if not selected_item:
            return

        item_index = self.tree.index(selected_item[0])
        if item_index >= len(self.data):
            return

        image_url = self.data[item_index].get("itemImage")
        if not image_url:
            self.status.config(text="No image URL available")
            return

        ImageModal(self.root, image_url, self.cache_dir)
        self.status.config(text="Image modal opened")

def main():
    root = tk.Tk()
    app = APIDataApp(root)
    root.mainloop()

if __name__ == "__main__":
    main()