To create a PHP AJAX CRUD application with Bootstrap for a better appearance, follow these steps:
1. Set Up the Environment
Make sure your server environment (like XAMPP, WAMP, or MAMP) is running with PHP and MySQL support.
2. Create the Database
Create a database and a table in MySQL:
CREATE DATABASE crud_app;
USE crud_app;
CREATE TABLE products (
id INT(11) AUTO_INCREMENT PRIMARY KEY,
name VARCHAR(255) NOT NULL,
description TEXT,
price DECIMAL(10,2),
created_at TIMESTAMP DEFAULT CURRENT_TIMESTAMP
);
3. Set Up Project Files
Create the following files:
index.php– The main interface.db.php– Database connection.ajax.php– Handles AJAX requests.script.js– JavaScript for handling AJAX and DOM manipulation.style.css(optional) – Custom styles.
4. Create db.php
This file will handle the database connection.
<?php
$servername = "localhost";
$username = "root";
$password = "";
$dbname = "crud_app";

$conn = new mysqli($servername, $username, $password, $dbname);

if ($conn->connect_error) {
    die("Connection failed: " . $conn->connect_error);
}
?>
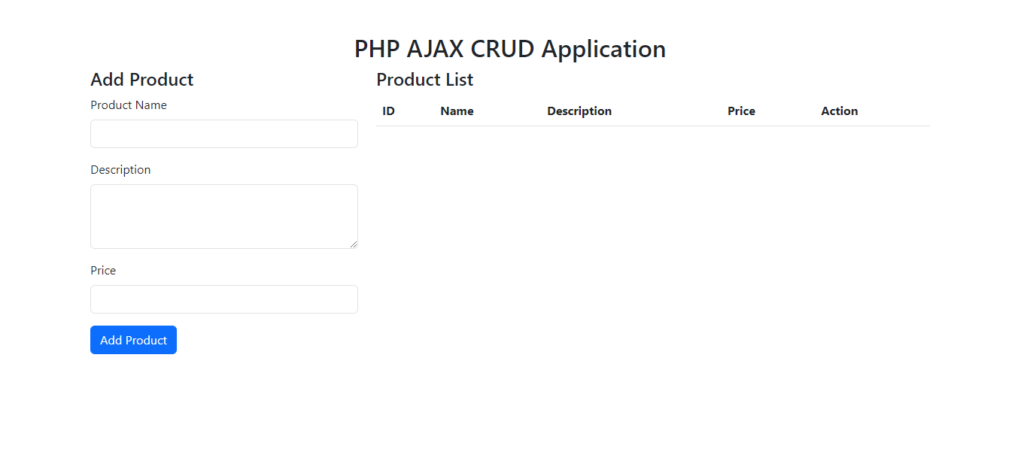
5. Create index.php
This will be the main UI using Bootstrap.
<!DOCTYPE html>
<html lang="en">
<head>
    <meta charset="UTF-8">
    <meta name="viewport" content="width=device-width, initial-scale=1.0">
    <title>PHP AJAX CRUD</title>
    <link href="https://cdn.jsdelivr.net/npm/bootstrap@5.3.0/dist/css/bootstrap.min.css" rel="stylesheet">
    <link rel="stylesheet" href="style.css">
</head>
<body>

<div class="container mt-5">
    <h2 class="text-center">PHP AJAX CRUD Application</h2>
    <div class="row">
        <div class="col-md-4">
            <h4>Add Product</h4>
            <form id="productForm">
                <div class="mb-3">
                    <label for="name" class="form-label">Product Name</label>
                    <input type="text" class="form-control" id="name" required>
                </div>
                <div class="mb-3">
                    <label for="description" class="form-label">Description</label>
                    <textarea class="form-control" id="description" rows="3" required></textarea>
                </div>
                <div class="mb-3">
                    <label for="price" class="form-label">Price</label>
                    <input type="number" class="form-control" id="price" step="0.01" required>
                </div>
                <button type="submit" class="btn btn-primary">Add Product</button>
            </form>
        </div>
        <div class="col-md-8">
            <h4>Product List</h4>
            <table class="table table-striped" id="productTable">
                <thead>
                    <tr>
                        <th>ID</th>
                        <th>Name</th>
                        <th>Description</th>
                        <th>Price</th>
                        <th>Action</th>
                    </tr>
                </thead>
                <tbody>
                    <!-- Data will be appended here using AJAX -->
                </tbody>
            </table>
        </div>
    </div>
</div>

<script src="https://code.jquery.com/jquery-3.6.0.min.js"></script>
<script src="script.js"></script>
</body>
</html>
6. Create ajax.phpThis file will handle CRUD operations using PHP and return data to the frontend via AJAX.
<?php
include ‘db.php’;
if (isset($_POST[‘action’])) {
$action = $_POST[‘action’];
if ($action == ‘read’) {
$query = “SELECT * FROM products ORDER BY id DESC”;
$result = $conn->query($query);
$data = array();
while ($row = $result->fetch_assoc()) {
$data[] = $row;
}
echo json_encode($data);
}
if ($action == ‘create’) {
$name = $_POST[‘name’];
$description = $_POST[‘description’];
$price = $_POST[‘price’];
$query = “INSERT INTO products (name, description, price) VALUES (‘$name’, ‘$description’, ‘$price’)”;
$result = $conn->query($query);
if ($result) {
echo ‘Product added successfully!’;
} else {
echo ‘Error: ‘ . $conn->error;
}
}
if ($action == ‘delete’) {
$id = $_POST[‘id’];
$query = “DELETE FROM products WHERE id = $id”;
$result = $conn->query($query);
if ($result) {
echo ‘Product deleted successfully!’;
} else {
echo ‘Error: ‘ . $conn->error;
}
}
if ($action == ‘update’) {
$id = $_POST[‘id’];
$name = $_POST[‘name’];
$description = $_POST[‘description’];
$price = $_POST[‘price’];
$query = “UPDATE products SET name = ‘$name’, description = ‘$description’, price = ‘$price’ WHERE id = $id”;
$result = $conn->query($query);
if ($result) {
echo ‘Product updated successfully!’;
} else {
echo ‘Error: ‘ . $conn->error;
}
}
}
?>
7. Create script.js
This file will handle AJAX requests and DOM manipulation.
$(document).ready(function() {
fetchProducts();
// Fetch products
function fetchProducts() {
$.ajax({
url: ‘ajax.php’,
method: ‘POST’,
data: { action: ‘read’ },
success: function(response) {
let data = JSON.parse(response);
let rows = ”;
data.forEach(function(product) {
rows += `
<tr>
<td>${product.id}</td>
<td>${product.name}</td>
<td>${product.description}</td>
<td>${product.price}</td>
<td>
<button class=”btn btn-sm btn-warning edit-btn” data-id=”${product.id}”>Edit</button>
<button class=”btn btn-sm btn-danger delete-btn” data-id=”${product.id}”>Delete</button>
</td>
</tr>
`;
});
$(‘#productTable tbody’).html(rows);
}
});
}
// Add product
$(‘#productForm’).submit(function(e) {
e.preventDefault();
let name = $(‘#name’).val();
let description = $(‘#description’).val();
let price = $(‘#price’).val();
$.ajax({
url: ‘ajax.php’,
method: ‘POST’,
data: {
action: ‘create’,
name: name,
description: description,
price: price
},
success: function(response) {
alert(response);
$(‘#productForm’)[0].reset();
fetchProducts();
}
});
});
// Delete product
$(document).on(‘click’, ‘.delete-btn’, function() {
if (confirm(‘Are you sure you want to delete this product?’)) {
let id = $(this).data(‘id’);
$.ajax({
url: ‘ajax.php’,
method: ‘POST’,
data: {
action: ‘delete’,
id: id
},
success: function(response) {
alert(response);
fetchProducts();
}
});
}
});
// Edit product
$(document).on(‘click’, ‘.edit-btn’, function() {
let id = $(this).data(‘id’);
let name = prompt(‘Enter new product name:’);
let description = prompt(‘Enter new product description:’);
let price = prompt(‘Enter new product price:’);
if (name && description && price) {
$.ajax({
url: ‘ajax.php’,
method: ‘POST’,
data: {
action: ‘update’,
id: id,
name: name,
description: description,
price: price
},
success: function(response) {
alert(response);
fetchProducts();
}
});
}
});
});
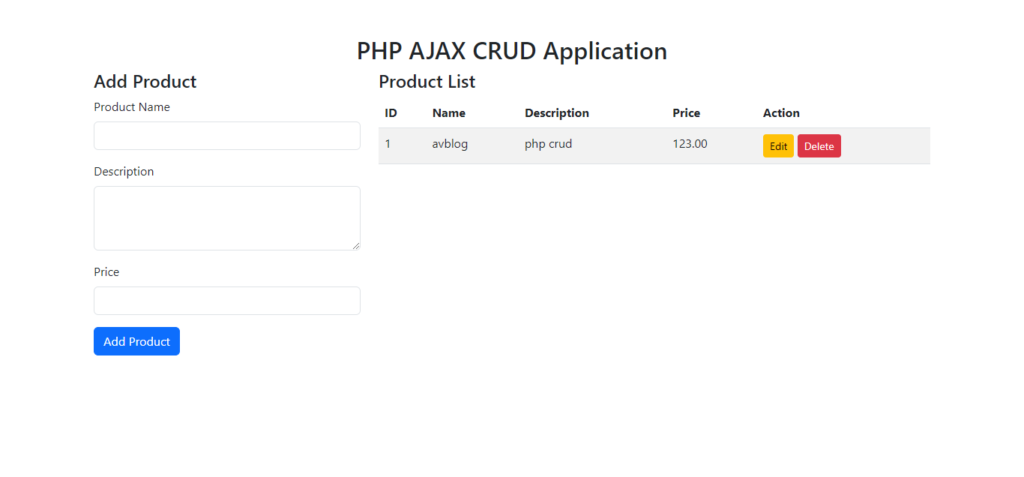
8. Run the Application
- Start your server and navigate to
http://localhost/your_project_folder/index.php. - You should see a simple, responsive CRUD application where you can add, view, edit, and delete products.
9. Customize the Appearance
You can customize the look and feel by editing the style.css file and adding additional Bootstrap classes.
10. Optional: Improve User Experience
Consider adding modals for editing and confirmation, tooltips, or more advanced validations to enhance the user experience.