How to Build a QR Code Scanner in Java for Android

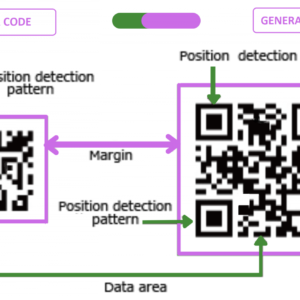
QR codes are widely used for storing information that can be quickly accessed using a smartphone. In this tutorial, we will learn how to create a QR Code Scanner in a Java-based Android application using the ZXing (Zebra Crossing) library. This implementation is simple, effective, and widely used.
Prerequisites
- Basic knowledge of Java and Android development.
- Android Studio installed.
- A physical Android device or an emulator with a camera.
Step 1: Add Dependencies
We will use the ZXing library for scanning QR codes. Add the following dependency to your project’s build.gradle file (Module: app):
dependencies {
    implementation 'com.journeyapps:zxing-android-embedded:4.3.0'
}
Sync your project to ensure that the dependencies are properly downloaded.
Step 2: Add Camera Permissions
Since QR scanning requires camera access, add the following permission to your AndroidManifest.xml file:
<uses-permission android:name="android.permission.CAMERA"/>
<uses-feature android:name="android.hardware.camera" android:required="true"/>
This ensures the app can access the device’s camera.
Step 3: Create a QR Scanner Activity
Now, let’s create a new activity to handle the QR code scanning. We will use IntentIntegrator from ZXing to launch the scanner.
QRScannerActivity.java
package com.example.qrscanner;

import android.content.Intent;
import android.os.Bundle;
import androidx.annotation.Nullable;
import androidx.appcompat.app.AppCompatActivity;
import com.google.zxing.integration.android.IntentIntegrator;
import com.google.zxing.integration.android.IntentResult;
import android.widget.Toast;

public class QRScannerActivity extends AppCompatActivity {

    @Override
    protected void onCreate(Bundle savedInstanceState) {
        super.onCreate(savedInstanceState);
        startQRScanner();  // Start scanning when activity opens
    }

    private void startQRScanner() {
        IntentIntegrator integrator = new IntentIntegrator(this);
        integrator.setDesiredBarcodeFormats(IntentIntegrator.QR_CODE);
        integrator.setPrompt("Scan a QR Code");
        integrator.setCameraId(0); // Use rear camera
        integrator.setBeepEnabled(true);
        integrator.setBarcodeImageEnabled(true);
        integrator.initiateScan();
    }

    @Override
    protected void onActivityResult(int requestCode, int resultCode, @Nullable Intent data) {
        super.onActivityResult(requestCode, resultCode, data);

        IntentResult result = IntentIntegrator.parseActivityResult(requestCode, resultCode, data);
        if (result != null) {
            if (result.getContents() != null) {
                Toast.makeText(this, "Scanned: " + result.getContents(), Toast.LENGTH_LONG).show();
            } else {
                Toast.makeText(this, "Scan Cancelled", Toast.LENGTH_SHORT).show();
            }
        }
    }
}
This code launches the QR scanner and handles the result.
Step 4: Launch Scanner from MainActivity
Modify your MainActivity.java file to include a button that starts the QR scanner activity.
MainActivity.java
package com.example.qrscanner;

import android.content.Intent;
import android.os.Bundle;
import android.view.View;
import android.widget.Button;
import androidx.appcompat.app.AppCompatActivity;

public class MainActivity extends AppCompatActivity {

    @Override
    protected void onCreate(Bundle savedInstanceState) {
        super.onCreate(savedInstanceState);
        setContentView(R.layout.activity_main);

        Button scanBtn = findViewById(R.id.scan_button);
        scanBtn.setOnClickListener(new View.OnClickListener() {
            @Override
            public void onClick(View v) {
                startActivity(new Intent(MainActivity.this, QRScannerActivity.class));
            }
        });
    }
}
This allows the user to open the scanner by clicking a button.
Step 5: Design the UI
Modify activity_main.xml to include a simple button for scanning.
activity_main.xml
<Button
    android:id="@+id/scan_button"
    android:layout_width="wrap_content"
    android:layout_height="wrap_content"
    android:text="Scan QR Code"
    android:layout_gravity="center"/>
This button triggers the QR scanner when clicked.
Step 6: Run and Test the App
Now that everything is set up, build and run your application on an emulator or a real device.
Expected Outcome:
- When the app starts, the user can tap on “Scan QR Code”.
- The scanner will open and allow scanning of QR codes.
- Upon successful scan, the QR code content will be displayed as a Toast message.
Alternative: Using Google ML Kit for Barcode Scanning
If you need a more advanced approach with a custom camera UI, you can use Google ML Kit for barcode scanning. This allows you to scan different barcode formats, including QR codes.
Would you like help implementing Google ML Kit instead? Let us know in the comments! 🚀
Conclusion
Creating a QR code scanner in an Android application using Java and ZXing is simple and effective. By following these steps, you can integrate QR scanning functionality into your app within minutes.
🔹 Key Features of This Approach:
- Uses ZXing library (lightweight and reliable).
- Simple implementation with IntentIntegrator.
- Requires only minimal setup and permissions.
Now go ahead and try it out in your own project! 🚀 Happy Coding! 🎉